Unlock Deep Mobility: 7-Day Flexibility Challenge

Flexibility Challenge

Introduction

Why it’s important to be flexible and what this challenge may do for you

We often overlook the importance of flexibility, both physically and mentally, due to our hectic schedules. But being able to move freely is really crucial for our health, posture, and the quality of our movement. Flexibility challenge is a key aspect of functional fitness, whether you’re just starting out and want to loosen up your tight hips or you’re an athlete who wants to move to do better. The Fitness Blender 7-Day Flexibility Challenge is a designed program that is simple for beginners to follow. In just one week, it will help you get your mobility back, alleviate muscle stiffness, and return your body back to its normal range of motion.

This flexibility challenge isn’t just about touching your toes. It’s about:

  • Getting rid of muscle tension from things you perform every day, such as sitting, lifting, and being stressed
  • Better circulation and health in the joints
  • Moving and breathing in a way that makes the mind and body work better together
  • Injuries can be prevented by promoting a balance between strength and flexibility.

Every day, you focus on a different part of your body, such as your hips, spine, shoulders, etc., to make sure you improve your whole body without being too weary. Sessions last between 20 and 35 minutes, don’t require much equipment, and include both static and dynamic stretching, mobility work, and breath control. More significantly, there are many ways to track your progress each day, so by Day 7, you will be able to observe real flexibility changes.

You don’t have to be flexible to get started; you just have to stick with it. You don’t have to be flexible all the time; it can improve with daily effort. Flexibility challenge meets you where you are, whether you’re stiff or already moving, and takes you one step farther every day.

Take a deep breath, get a mat, and get ready to see the difference.
It’s time to start on the road to a physique that is more flexible, open, and balanced.

Table of Contents

Day 1 Flexibility Challenge: Baseline and full-body introduction stretch

Goal: Light full-body stretching routine with self-assessment tools for Flexibility challenge

Summary:

The Fitness Blender 7-Day Flexibility Challenge starts on Day 1. It’s not only about stretching; it’s also about understanding how flexible your body is at the moment. This session teaches the body gentle moves that work for all the major muscle groups and helps you identify tight spots that require additional attention during the challenge. The purpose is to raise awareness, avoid harm, and set baseline data to use as a comparison for progress on Day 7.

What to Expect:

The practice starts with a low-impact dynamic warm-up to get blood flowing and prepare the muscles for stretching. Then, you’ll do full-body stretches that focus on your spine, hamstrings, shoulders, chest, and hips. Each of these stretches will last 20 to 30 seconds, with a focus on breathing and maintaining proper alignment. You won’t push yourself to your limit; instead, you’ll move with control and pay attention to how far you can go right now.

Baseline Tests:

Test of the Distance from Fingertip to Floor:

Stand up straight with your feet hip-width apart and your knees straight but not locked. Slowly bend forward and try to touch the floor. Measure the distance from your fingertips to the floor in inches or millimetres. Write down this number.

Shoulder Reach Mobility Test:

Put one hand over your shoulder and the other up your back. Try to touch or cross your fingers. Write down if your fingers contact, overlap, or stay apart, and by how many inches.

Breathing Rate While Stretching:

Count how many slow, full breaths you can take while holding a stretch for 30 seconds. Lower breath counts, such as 4 to 5 breaths per minute, indicate that you are more relaxed and ready to be flexible.

Important Stretches:

Standing Forward Fold: This stretch targets the hamstrings and calves.

Cat-Cow Stretch: Moves the spine around

Chest Opener (Hands Clasped Behind Back)—Opens up the shoulders and chest.

Supine Spinal Twist: Relaxes the lower back

Wall-Assisted Shoulder Stretch: Helps your shoulders move more freely.

Day 1 Goal:

Do each stretch slowly and without any pain.

Find the three regions that are the tightest (e.g., hips, hamstrings, shoulders).

Write down all the assessment data so you may use it to compare on Day 7.

Set a goal of being flexibility challenge: What do you want to get out of this challenge?

Flexibility Challenge

Day 2: Flexibility challenge in the hips, hamstrings, and glutes

Goal: Make the hips and posterior chain more Flexibility challenge.

Summary:

Day 2 focuses on the lower body, specifically targeting the hamstrings, hip flexors, glutes, groin, and calves, which are the areas where most people tend to hold tension. Sitting for a long time, lifting weights, exercising, or maintaining poor posture can cause these muscles to become tense. If you don’t take care of these regions, they may become tight and cause back pain, alter your posture, and reduce your athletic performance. This session will help you progressively release stiffness through deep static stretches and mobility activities. These changes will last.

Body Awareness and Metrics:

Before you start, check or measure:

Seated Forward Fold Reach: Sit down with your legs straight out in front of you. Reach for your toes and see how far away you are from touching them (or going past them).

Pigeon Position Comfort Rating (1–10): Perform the pigeon position on both sides and score it based on how deep and comfortable it feels.

Hip Rotation Range (visual): Sit in a 90-degree hip stretch. How far can you lean forward without hurting yourself?

Keep an eye on these today and check back in on Day 7.

Routine Breakdown:

Warm-Up (5 minutes)

Leg swings (to the front and the side)

Circles around the hips

Squats with your weight

These motions help the hip joints move more easily and get the muscles ready for more intense labour.

Main Flexibility challenge Work (20 to 25 minutes)

Low lunge with arm reach (hip flexors): Hold each side for 30 seconds.

Seated Forward Bend (hamstrings): Slowly reach and breathe deeply.

Pigeon Pose (glutes and hips) for 30 seconds on each side.

Butterfly Stretch (for the inner thighs and hips): Gently push your knees toward the floor.

Wall Calf Stretch (calves and Achilles)—Do it with both bent and straight knees.

Breathing and cooling down (5 minutes)

Legs up the wall (calms the nervous system and gets rid of lactic acid)

Breathe in for four seconds and out for six seconds.

Consider how your body is functioning right now.

Day 2 Goal:

Make your forward fold at least 0.5 inches deeper.

Notice how the left and right hips are not the same (for example, in pigeon pose).

By the end of the workout, lower the reported tension in the hips by 1 to 2 points.

Raise awareness about how tightness in the glutes and hips can impact posture and walking.

Extra Tips for Flexibility Challenge:

If you’re too tight, place a yoga block or pillow under your hips when you’re in a pigeon pose.

Breathe into discomfort, not through pain.

Drink water after your session to help eliminate metabolic waste that accumulates during stretching.

Flexibility Challenge

Day 3: Flexibility challenge in the upper body (neck, shoulders, and chest)


Focus: Relieving tension in the neck, shoulders, and chest caused by stress and poor posture.

On Day 3 of flexibility challenge, we’ll focus on the neck, shoulders, upper back, and chest, which are all areas of the upper body that commonly hold tension due to stress, desk work, and poor posture. This session will help you get back in balance if you’ve ever felt stiff in your traps or that your chest was “pulling you forward.” The idea is to lengthen muscles that are too short, improve the scapula’s movement, and provide the shoulder joint with a greater range of motion. Stretching these areas also helps you breathe more easily and stand up straighter, which makes it easier to sit, stand, and move around like yoga.

Metrics Before the Session:

Before you begin, check and write down:

To do the Wall Angel Test, stand with your back against a wall and your arms in the “goalpost” position. Can you keep your wrists and elbows flat against the wall?

Neck ROM Test: Move your head slowly from side to side. How much can you turn? Use phrases like “chin over the shoulder” or “45° tilt” as markers to guide your movements.

Wrist Extension Check: 

Get on all fours and bend your wrists to 90°. Is there pain or a lack of movement?

Please keep track of them so you can recheck your progress on Day 7.


Breakdown of the Routine:

Five minutes of warm-up

Rolls and shrugs of the shoulders

Half-circles of the neck (forward and side to side)

The arm swings across the chest.

Main Flexibility Challenge Routine (20 minutes)

Doorway Chest Stretch (for the pectoral muscles) for 30 seconds on each side

Thread the Needle (for the shoulders and spine) for 30 seconds on each side.

Eagle Arms (rhomboids and posterior deltoids) for 20 to 30 seconds

Stretch each side of your neck and arm for 30 seconds.


Wall Angels: 

Do 2 sets of 8 slow reps.

Stretch your wrist flexors for 30 seconds on each side.

Five minutes to cool down.

Chin tucks (make your neck stand up straighter)

Deep breathing while sitting with your arms over your head

Think about how your shoulders feel. Are they lighter or looser?

Day 3 Goal:

Relax the stiffness in your upper body, especially in your neck and traps.

Increase shoulder range of motion by 10 to 15%.

Lower the level of tightness or stiffness in your neck by 2 points on a scale of 1 to 10.

Be more aware of your posture when you sit or type.

How to Succeed:

Don’t push your neck or shoulders into a deeper stretch; let gravity do the work.

Keep your breathing steady. Try to breathe in for four seconds and out for six.

If you can’t clasp your hands, use a cloth for eagle arms.

Flexibility challenge

Day 4 Flexibility Challenge: Moving Your Core and Spine

Focus: Increase the range of motion in your spine, the range of motion in your rotation, and the activation of your core muscles.

Summary:

Day 4 focuses on one of the most crucial but often forgotten parts of flexibility challenge: the spine and core. Your spine has to be flexible and mobile for everything from walking and lifting to reaching and twisting. When the spine doesn’t move as much, it might hurt the lower back, make it hard to breathe, and make it hard to move the whole body. Today’s exercise focuses on the thoracic (mid-back) and lumbar (lower back) areas while also working your core to help you stand up straighter and avoid getting hurt.

This day also helps you do better at compound workouts and sports, and it relieves stress from sitting or slouching for a Satan-long time.

Metrics Before the Session:

Use these measures to see how flexible your core and spine are:

Seated Spinal Twist Reach: Sit with your legs straight out in front of you, twist to one side, and reach behind you. Find out how far your hand is from your hip or back.

In a prone cobra stance, push your chest off the ground and see how high it goes.

Spine Mobility Score (1–10): 

Give your back a score based on how easily it bends, rotates, or twists.

Routine Breakdown:

Five minutes of warm-up

Cat-Cow Pose (move the spine smoothly)

Twists of the torso while standing

March in place while turning your upper body.

Main Flexibility Challenge Flow (20–25 minutes)

Hold each side of the seated spinal twist for 30 to 45 seconds.

Three sets of gradual transitions from Cobra to Child’s Pose

Happy Baby Pose: 

Opens up the hips and lower back

Kneeling Side Bend Stretch: Works the obliques and ribs.

Supine Spinal Twist with Arm Stretch: This move turns the spine and shoulders.

Bridge Pose with Breathing: Opens hip flexors and strengthens the spine.

Cool Down (5 minutes)

Three rounds of diaphragmatic breathing: inhale for 4 seconds and exhale for 8 seconds.

Softly seal the spine with a gentle cat-cow.

Lie down flat in corpse pose and check your whole body for tension.

Day 4 Goal For Flexibility Challenge:

Increase the spine’s range of motion by at least 10°.

Ease any pain in your lower back caused by stiffness.

Become more aware of your core and spine.

Feel more aligned and straight as you sit down.

How to Get the Best Results:

Never force your spine to twist; only twist it until you feel resistance, not pain.

If your lower back rounds as you sit, put a folded blanket or cushion beneath your hips.

During the day, keep your posture straight to help what you build during stretching.

Flexibility Challenge

Day 5: Flexibility challenge and balance while moving

Focus: Improve your range of motion, stability, and control over your muscles and nerves.

Summary:

By Day 5 for flexibility challenge, your body has learnt about passive flexibility challenge, which is extending your muscles while they are relaxed. Today, the focus is on active flexibility challenge, which means engaging your muscles to go into and hold different ranges of motion. This not only helps you become more flexible, but it also helps you achieve control, stability, and balance. Active flexibility is very important for staying fit, doing well in sports, and avoiding injuries. Balanced flexibility and strength are important whether you’re reaching, jumping, or just trying to keep your posture straight.

Active flexibility drills also improve neuromuscular coordination, which helps your body learn how to move better. This session combines stretches with slow, controlled movements that work the stabiliser muscles, notably in the hips, ankles, and core.

Metrics Before the Session:

Keep an eye on these to see how well you’re doing:

Balance Time Test: Stand on one leg and do a stretch that helps you keep your balance, such as a quad stretch. Check how long you can keep stable.

Dynamic Range of the Hamstring: When you swing your leg while standing, pay attention to how high it lifts without using any force.

Body Control Rating (1–10): How fluid and solid do your movements seem when you change positions?

Routine Breakdown:

Warm-Up (5 minutes)

High knee pulls (stretching the hips and balancing)

Dynamic leg swings (front/back and side to side)

Shoulder circles and torso rotations

Main Active Flexibility Challenge Flow (20 to 25 minutes)

Dynamic Lunge with Overhead Reach: This move opens up the hips and thoracic spine.

Standing Quad Stretch with Arm Reach: a balance and front body stretch

The Warrior III Flow (Aeroplane Pose) helps you control your hips and hamstrings.

Dynamic Hamstring Reach (Toe Taps) works your core and your mobility.

Downward Dog to Plank Transitions: Stretch and control your whole body.

Standing Side Bends with Reach: strengthens the sides of the body

Five Minutes to Cool Down

Deep squats with arms out (passive hold)

Seated forward fold with a concentration on breathing

Hold your equilibrium for one minute with your eyes closed (advanced).

Goal for Day 5:

Increase the time you can balance on one leg by 10 to 15 seconds.

Raise the height of your standing dynamic hamstring reach.

Make muscles stronger towards the end of their range of motion (for example, hips and glutes).

Feel more stable and grounded as you go about every day.

 How to Succeed:

Don’t worry about how fast you’re going; instead, focus on how much control you have.

To improve your equilibrium, keep your eyes on one place (drishti).

If you need it, use a chair or wall for light support, especially at first.

Flexibility Challenge

Day 6 Flexibility Challenge: Deep Stretch and Rest

Focus: relaxing the nervous system, recovering muscles, and improving long-term flexibility.

📝 Summary:

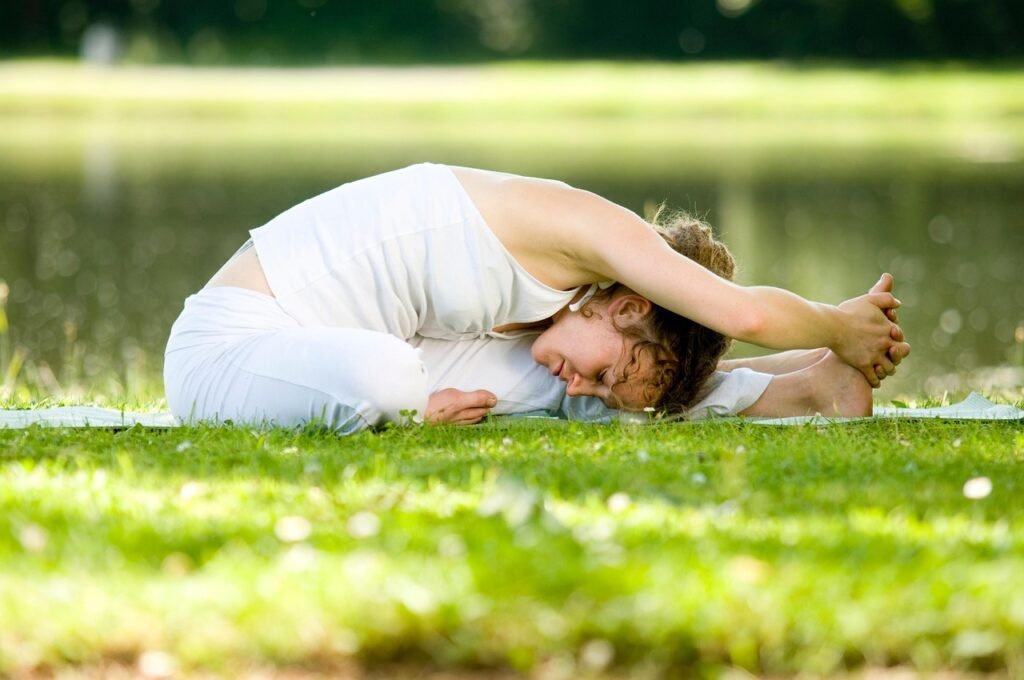
On Day 6 for flexibility challenge, it’s all about getting better, letting go, and getting back to normal. Your body may be sore, weary, or tense after five days of flexibility challenge in a row. Now is the best moment to slow down and let your muscles and fascia (connective tissue) relax completely. Today’s lesson includes passive stretching techniques, which entail holding soft stances for a long time—usually 1 to 2 minutes—while breathing deeply and letting gravity do the work.

This kind of flexibility challenge can help your muscles relax, make your tissues more elastic, and make you more flexible in the long run. It also works on the parasympathetic nervous system, which is in “rest-and-digest” mode, to lower cortisol levels and relax the mind.

📊 Metrics Before the Session:

Stretch Hold Tolerance: On a scale of 1 to 10, how comfortable do you feel holding a stretch for 60 seconds?

Breath Rate (Relaxed): Count how many times you breathe in a minute when at rest. Try to get 4 to 6.

Tightest Muscle Group: Figure out which muscle group is the hardest to stretch at first (for example, your hips or hamstrings).

Routine Breakdown:

Getting ready (2 minutes)

Use a yoga mat or other comfortable surface and dim the lights.

Listen to quiet music or white noise.

You can put a folded towel under your hips and knees for support if you want.

Deep Stretch Sequence (25–30 minutes)

Legs Up the Wall (Viparita Karani) for 3 minutes (improves blood flow and relaxes the nervous system)

Reclined Bound Angle (butterfly on back) for 2 minutes to open up the hips and inner thighs.

Seated Forward Fold for 2 minutes (stretches the hamstrings and lower back).

Frog Pose: 

2 minutes (opens up the hips deeply)

Extended Child’s Pose with Side Reach for 2 minutes (works the spine and lats)

Supine Spinal Twist—2 minutes on each side (helps with digestion and eases back pain)

Corpse Pose (Savasana) for 3 to 5 minutes (complete body relaxation and integration)

Five minutes of breathing and cooling down

Three cycles of box breathing (inhale for 4 seconds, hold for 4 seconds, exhale for 4 seconds, hold for 4 seconds)

Gentle body scan meditation: shift your focus from your head to your toes.

🎯 Day 6 Goal For Flexibility Challenge:

Get used to holding for longer than 60 seconds.

Lower signs of stress, including heart rate, breathing rate, or tension score

After the session, your mind will be clearer, and you’ll sleep better.

Find out how much progress you’ve made in relaxing and opening your joints.

💡 Advice for Getting the Best Results:

Use pillows, belts, or blocks to take some of the pressure off of tight spots.

Don’t hurry. Let your body go deeper into the stretch with the help of gravity and your breath.

Stay in the moment with your breath. Try breathing through your nose to relax more.

It’s not about pushing; it’s about giving in.

Flexibility Challenge

Day 7: Flexibility Challenge For Flow and the Last Test

Focus: integrating the whole body, moving fluidly, and checking on progress after the flexibility challenge

Summary:

Day 7 is the last day of your flexibility challenge. Your muscles are probably more flexible, your joints are probably more open, and you probably have a better sense of your body. Today’s class is a flow-style routine that puts together what you’ve learnt over the past six days into a seamless, planned, and refreshing experience.

Along with moving, you’ll also be retesting your Day 1 and Day 2 flexibility challenge to see if your range of motion, comfort, and body control have really improved. This isn’t a workout; it’s a way to celebrate your accomplishments and create a new standard for keeping up your flexibility.

Final Evaluation Metrics:

Go back to your original notes and measure again.

Test from fingertip to floor.

Shoulder Reach Test (behind the back)

Seated Forward Fold Reach

How deep and comfortable is the pigeon pose (1–10)?

Test for Wall Angels (wrist and elbow contact)

Time to balance (one leg).

Breathing Rate (when holding deep)

Put your progress on a chart to see how far you’ve come. Most people will feel more comfortable and have a better range of motion (ROM) by 5% to 30%.

Flow Routine (25–30 minutes):

Warm-Up with Movement (5 minutes)

Circles with your torso, rolls with your neck, and swings with your shoulders.

Leg swings and turns of the spine

Integrated Flexibility challenge Flow for 20 minutes.

(Do each movement for 20 to 30 seconds, then do them all again in a smooth order.)

Downward Dog to Cobra Flow: Lengthening the Whole Body

Warrior I to Humble Warrior: 

Stretch your hips, quads, and back.

Wide-Leg Reach to Seated Forward Fold: Hamstrings and Inner Thighs

Twisted Lunge to Side Stretch: 

Shoulders, spine, and obliques.

Pigeon Pose to Reclined Twist: This stretches your hips and back.

Standing Quad Pull to Balance Hold: Stretching and stability.

Shoulder combination of Eagle Arms and Chest Opener.

Cool Down and Think (5 minutes)

Nasal breathing in Savasana (2–3 minutes)

Gratitude moment and body scan

Write out three things you’ve noticed about how flexible you are. Day 7 Goal:

Do a full-body flow with smooth transitions.

Find 2–3 significant areas where things have clearly gotten better.

Use metrics to keep track of your progress, such as inches gained, tension released, and balance improved.

Choose what to do next: 

Repeat the Flexibility challenge, keep doing it 2–3 times a week, or add yoga or mobility work.

Extra Tip:

You might want to think about setting up a monthly mini-assessment to keep track of how flexible you are. Even 10 minutes a day of targeted mobility will help you keep and build on what you’ve already done.

Leave a Comment

Your email address will not be published. Required fields are marked *